Back
EffectsED Tutorial
This tutorial is not yet complete.
Saturday, January 3, 2009
Not sure how many words
This tutorial is written to familiarize you with the interface of EffectsED. Hopefully, it will get you on your way to making your own cool effects.Just like scripting, let's make sure you have the Jedi Academy Multiplayer SDK. You'll need it.
Once you have it installed, you should find an EffectsED folder wherever you installed it. Inside that folder, you'll see EffectsED.exe. Open this program.

When you start EffectsED for the first time, it will probably ask you for some paths. If you mess up, don't worry, you can always go to Edit > Set Default Game Paths to change it back (like I am).
EffectsED needs linked to your base folder. Go ahead and input your path, or if you used the default JA install directory, you should be able to just click the "default location" button. Your window will look different than mine - I set the folder to GameData by mistake, so I'm fixing it.

As usual, my folders will be different from yours. Don't copy me, or you may get yourself in a mess.
Opening an effect and looking around
Once EffectsED is started correctly, this is what you should see:

Now let's explain how effects work. Stay with me, because this is the core of it. For the most part, Jedi Academy renders effects via a particle system. When an effect is triggered, particles will be generated. These particles behave like a sprite (like an autosprite shader, to be exact) - they consist of a single texture that always faces the camera. EffectsED will let you set the size, momentum, angle, origin offset, color and life of these particles, and more.
If you're still confused, let's open up an effect file to see a quick example. Open up base/effects/sabers/saber_clash.efx.
If you don't have an effects folder or you can't find the effects files, or if EffectsED complains about missing textures or shaders, then you will need to unzip some assets. Click here for instructions.
Once you have it open, you should see this:

Press the play button, or hit your spacebar to play the effect. You should see a puff of white smoke and some sparks. Press and hold the spacebar for a few seconds - you should see the effect play repeatedly. This is almost how it would look if it were coming out of an emitter (it would a tad more sparse, but you get the idea).
You can use the pause button to pause an effect during playback, or you can hit the stop button to instantly terminate the effect. This will make all particles disappear.
As it stands right now, the angle in the 3D view right now doesn't offer much perspective. You'll probably want to move around and see the effect a little better. Here's how camera movement in EffectsED works:
• To move the camera, hold in alt, left-click and drag in the 3D view.
• To rotate the camera, left-click and drag in the 3D view.
• To zoom the camera in/out, right-click and drag in the 3D view.
You may also want to remove the walls, or maybe you want to remove the flag/windsock thing. That's easy - there are buttons on the toolbar for that. The room is quite small, so I find it better to turn the walls off.

Move around and play the effect a few more times. You should be able to see the individual particles very easily. Notice the smoke puff - it is also a particle.
Understanding Effects
Now it's time to get messy. Take a look under your 3D window. You should see some checkboxes under it with some attributes listed next to each one. I don't know what to call them, so I'll call them "instances" (it's a programming term). These 'instances' will generate particles or perform other actions that you can specify.

We'll start with particles.
Particle effects are simple to understand. The game will take size, origin, movement, color and transparency values, and randomize them within a certain range. Click on the one labeled "Unnamed Particle 2" (the smoke puff). You should see the tabs on the right side of the screen change. (If they don't, it doesn't matter.)

There is one more thing you need to understand about EffectsED. Whenever you see two text boxes, color pickers or sliders side-by-side, it means that the effect will use a random value between the two numbers. This is how effects can look different every time. It is probably the most useful feature in EffectsED.
I'll make a big point of this as we go along, so don't worry. It's a useful thing, so I'll give it a lot of attention.
Now, let's go over these values one-by-one. We'll start with the Generation tab. Most of this stuff is no-brainer information, so you should find this pretty easy.
As you might have guessed, this tab contains the settings for generating particles from this instance. We'll start at the top.
|
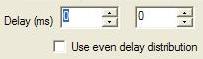
The Delay value will force the particle effect to wait before appearing. It is set in MilliSeconds (ms), and the number used will be a random amount between the two values. So if you want the effect to be anywhere between .5 seconds and 2 seconds, you would input 500 into one of the text boxes and 2000 into the other.
|
|
Underneath the Delay is a checkbox called "Use even delay distribution". This box works when you have multiple particles being generated by your Count values (more info on Count below). If the Use even delay distribution box is checked, then the particles will be generated with the same amount of space between them, instead of randomly coming out everywhere. If this is a little too in-depth for you, don't worry about it. It's a more "advanced" feature.
|
|
|
|
Next up is the Count value. This value will determine how many particles will be created. Again, it will be a random number between the two values you set. If you want a constant number, just put the same number in both text boxes.
|
|
|
The Life value controls how long the particle will "live" after being created. If you want the particle to last for 2 to 3 seconds, you would put 2000 in one box and 3000 in the other.
|
|
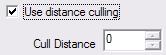
Next, you will see a checkbox labeled "Use distance culling". If you check this box, the Cull Distance box will become usable. Basically, this feature means that if you are a certain distance away, the particles will disappear. This should help save FPS if you are using effects in a large, open area. The distance is in map units, and obviously, it cannot be randomized.
|
|
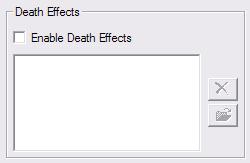
Last, we come to the Enable Death Effects checkbox. If you check this box, then whenever the life of this particle runs out, a Death effect will play. A death effect is just another effect file, so there's nothing special there. You can choose which effect file to play by clicking the folder icon and browsing for it.
Death effects can be used in a variety of ways. Let's say you have a particle effect that you want to change behavior after a few seconds. This would be easy by giving it a short lifespan, and setting it to play a death effect that looks identical, but has the changed behavior. |
That's it for the Generation tab. Let's move on to the Origin/Size tab.
Under this tab you will see a bunch of new options:

Again, let's go over these one at a time.
|
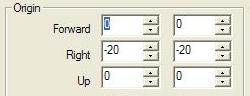
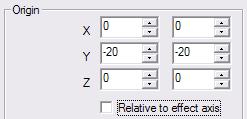
The Origin values are tricky. Basically, the values you set will affect where the particles appear from. As with most things in EffectsED, you can input two different values, and it will choose a random value between those numbers for each particle. However, you have control over all three axes - you can use this to disperse effects at the point of origin.
|
|
|
Then there's this tricky little checkbox...watch this one, it'll bite you from behind. If Relative to effect axis is checked, then your effects will be aimed the same direction the fx_runner is. If you uncheck this box, it will force your effects to always choose values based on the actual X Y Z coordinates of the engine, regardless of where the fx_runner is pointing.
|
|
Notice that when you uncheck the "Relative to effect axis" box, the origin axes change. You can now force a random origin point along the X, Y and Z axes.
|

|
The Enable special offset types checkbox will allow you to offset the origin by a shape. This means that instead of setting the origin with random number values, the particle will appear anywhere within a specified shape. You can select "Spherical/Elliptical" or "Cylindrical". In case you don't know what those mean, Spherical/Elliptical will create an invisible sphere or ellipsis, and the particle will spawn inside of it. If you choose Cylindrical, it will create an invisible cylinder instead.
I don't know for sure what the "Set effect axis to offset direction" checkbox does...my guess is that it will create an angle for the particle by comparing it to the origin of the effect. Don't take my word on that, I've never used it before. |

|
The Size/Width values will set the size of your particle. As with everything else, the number used will be a random value between the two values you set for each property. If I put 8 and 200 in the Start Size values, the particle would be a random size between 8 and 200. Now...here's where this one gets interesting. End Size will allow you to make a particle change size during it's life. If the end size is bigger than the start size, then the particle will grow until it reaches the end of it's life. And again, the End Size will be a random number between the two values you give.
The Transition value will let you choose a preset value from a dropdown menu. For most uses, you'll just leave it at linear. Basically, this box will affect how the size of the particle is changed. If it is linear, the particle will change at a constant rate over time. If it is set for wave, it will change in a SINE wave pattern. I've only ever used linear, but you may find some uses for it. I don't know what the Parameter values or the Apply Random Factor checkbox will do. |
|
|
Now we come to the Always draw on top checkbox...don't use it. if you check this box, it means that your effects will be visible through walls, players, other effects and anything else. Like I said, don't use it.
|
That brings the Origin/Size tab to a close. Are you understanding how this works yet? If not, take it nice and slow, reread some things and do a lot of experimenting. If you don't understand something, change the values and play the effect.
If you have the hang of things, you should be able to see how the Motion tab works without reading about it. It's the same thing you've been doing all along. Just in case you aren't up to speed yet, I'll cover the major highlights.


|
As you might have guessed, the Velocity values modify the speed of the particles. Just like the Origin values, you have three different values - one per axis. As usual, the value used is a random number between the two that you specify.
|
|
|
Again, this will bite you from behind. If Relative to effect axis is checked, then the movement will be affected by the angle of the fx_runner. If you uncheck this box, it will force your effects to always choose values based on the actual X Y Z coordinates of the engine, regardless of where the fx_runner is set facing.
|

|
Notice that when you uncheck the "Relative to effect axis" box, the Velocity axes change. You can now force a random movement value along the X, Y and Z axes.
|

|
The Accelaration values will specity how much the particle will accelarate during it's life. This should be used carefully in normal cases, because it can generate some unrealistic results. After all, things usually slow down as they move. I'm sure using negative values can prove useful to a degree, though.
Just like the origin values, you can set "Relative to effect axis" on or off to control the motion dynamically or on a specific axis. |

|
Gravity is a little odd. For some reason, the default quake value is -800, not 800. You can set it to whatever you want, but don't be surprised if it's a little funky. I had a lot of difficulty with this setting before...
|

|
I only got this to work correctly once, and shortly therafter it stopped working...the Rotation value will rotate your sprite image. This is useful to when you want things to look more dynamic, as long as it works. You'll have to play with it and see what happens, because I really don't know what I did wrong. XD
|
Next up is the Physics tab.

|
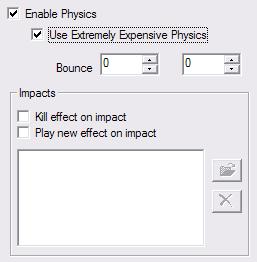
As you can see, there is a checkbox to Enable physics. I'll just let you know straight up: effect physics are also somewhat goofy. You have several different methods you can use to get the effects you want. The most useful one would be impact physics - when a particle is destroyed when it impacts a brush or other solid map object. But this type of physics only works if you have the Use extremely expensive physics box checked (Yes, it's bugged). The particles will go right through the wall if you forget to do this. (If you want the particle to disappear on impact, make sure you check the Kill effect on impact box.) Speaking of impact physics, you can also specify an effect to play when something impacts a surface. So for instance, if you have a lava spatter effect that you want to splash when it hits the ground, this is how you do it. All you need to do is specify an effect file for it to play (underneath the checkbox). |

|
You will see this message whenever you check the Use extremely expensive physics box. This basically is telling you that the effect is processor intense (CPU), so be careful how many effects in your map use this. It's not much of a concern, really...with modern PCs, it shouldn't have much of an effect at all. If you want this mod to work on older computers, then use it only when you have to.
|
|
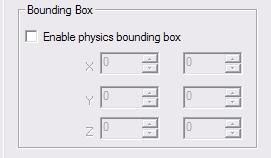
The other type of physics you can use is a physics bounding box. In the six boxes below the checkbox, you can define the dimensions of a box (the origin point is wherever the particles are generated from). Whenever a particle goes outside of this range, it will immediately be removed. Simpler and much less intense than impact physics, just not quite as cool.
|
Finally, let's go over the Color tab.


|
|
|
|